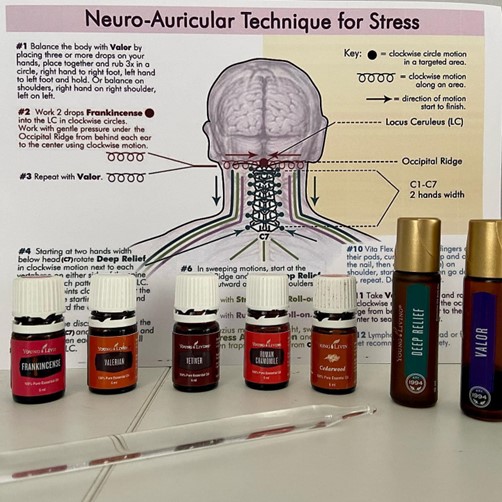
Purpose of Neuro-Auricular Technique
The purpose of the Neuro-Auricular Technique (NAT) is to jump-start and reconnect all of the synapses of the brain and upper spine, particularly in the locus ceruleus and vagal ganglia. The technique is applied along the occipital ridge, particularly focusing on the medullar area (center depression at base of skull) and along each vertebra of the cervical spine (the 7 vertebrae between the skull and shoulders that comprise the neck). There are 12 pairs of cranial nerves. These are nerves that emanate directly from the brain and not from the spinal chord. The first 8 pairs go to the eyes and tear ducts, ears, nose, tongue, facial and chewing muscles, lips, mouth, teeth, and salivary glands. There are 4 pairs that extend from the brain to the throat, larynx, lungs, heart, liver, stomach, large intestine, small intestine, and shoulders that extend down and out between the top four cervical vertebrae which comprises the vagal complex. The fact that there is a pair of cranial nerves directly from the brain to the muscles of the shoulders explains why tense shoulders can lead to headaches
The Neuro-Auricular Technique
Using the six oils in the sequence given below, the following seven-step procedure is done with each one. When the term, “probe” is used, it refers either to a glass medicine dropper or an auricular probe:
Oil Sequence: 1. Frankincense, 2. Valerian, 3. Vetiver, 4. Roman Chamomile, 5. Cedarwood, 6. Sandalwood
The client needs to be lying face down, preferably with a head cradle on a massage table. You as the facilitator will be sitting in a chair at the head. This technique can also be done with a client sitting backwards on a chair leaning forward on the back of the chair while the facilitator sits behind them or stands in front.
* 1. Apply oil (Starting with Frankincense) liberally across the occipital ridge (base of the skull) by dripping it from the bottle and rubbing it with your finger across entire occiput, making sure to include the oils at the center point, which is called the “locus ceruleus” or “medulla”.
* 2. Place tip of probe on the locus ceruleus. While keeping the tip of the probe on the same spot, make clockwise circles a few times with gentle pressure. Ask the receiver if the pressure is comfortable or not. If not, then lighten up.
* 3. Place tip of probe on right occipital bone and move probe side to side (parallel with ridge) working slowly toward the locus ceruleus. Then repeat starting on left occipital bone working, again, toward the center of the base of the skull, ending both times at the locus ceruleus with circular motions.
* 4. Apply same oil liberally on spine from about T3 or T4 (upper thoracic, exact starting point not important as long as it is in the upper thoracic) up the cervical vertebra to the atlas (top vertebra of spine next to skull) and locus ceruleus. Drip the oil from the bottle and smooth with your fingers to distribute the oil.
* 5. Starting with the lowest vertebra you have chosen in the upper thoracic place probe centered between a pair of vertebrae. Keeping the tip of the probe on the same spot, wave the probe up and down parallel with the spine a few times. Then move up the spine to the next vertebra probing the same way, then up to the next, and the next, until you get to the locus ceruleus (medulla) where you make a few clockwise circles. Make sure your pressure is comfortable to the receiver.
* 6. Then return to your upper thoracic starting point and place the tip of the probe on one side of the starting vertebra and rock the probe back and forth perpendicular to the spine a few times and then repeat on the other side of the same vertebra. The probe should be placed adjacent to the vertebral bone itself, not at the gap where the nerve root exits from the spine. It does not matter which side you start on first. Then after doing both sides at one location, move up to the next vertebra and do the same. Repeat this process on each vertebra through all of the cervical vertebrae until you get to the locus ceruleus where you do a few clockwise circles.
* 7. Hooking tips of the fingers along the occipital ridge, pull headward gently several times. If the client is sitting backwards on a chair, you will have to stand behind the chair, at the head, and pull upwards.
Upon completion of Step 7 above, go back to Step One with the next oil and repeat everything. Continue repeating the 7 steps above with each oil until all six oils have been applied, ending with Sandalwood. (Valerian comes after Frankincense, etc.) When you get to Vetiver (the third oil) it is too thick to readily drop from the bottle. Remove the dropper cap and administer by pouring from the bottle. There is no specific number of drops or amount of oil to be applied in this technique. None of these are hot oils. Just be sure there is enough to cover the portions of the spine involved and the base of the skull, including the locus ceruleus.
When you have completed the above seven-step procedure with each of the six oils in the order given, from Frankincense to Sandalwood, you are through. That is all there is to NAT.